
Adapt your workflows based on user sentiment
Last updated: 10 April 2025
Monitoring your user’s sentiment throughout a workflow may help you create a more empathic experience. Below we will go through some of the ways to implement sentiment analysis as part of a workflow.
Step 1: Enable the sentiment analysis add-on
Sentiment analysis is an optional add-on. To follow along, you will need the add-on enabled. Contact your account manager to enable it.
Step 2: Understand sentiment analysis
Sentiment analysis enhances your chatbot by enabling it to understand the emotions behind each user message.
When a user sends a message, our AI analyses the text to determine whether the user’s sentiment is positive, negative, or neutral.
We can use this information to respond more appropriately and empathetically.
For example:
If a user sends a message expressing frustration such as “This delivery is taking too long I want a refund”, the AI can recognise the negative sentiment and offer a more supportive and helpful response.
If a user sends a positive message such as “Amazing, this is so helpful”, the chatbot can acknowledge the user's satisfaction and reinforce the positive experience.
In the most extremely negative cases, some of our customers opt to escalate these users from the chatbot to live chat immediately. Learn to set this up.
Step 3: Use transitions
Go to the workflow Builder and open a workflow.
In transition between two steps, use the following conditional:
Sentiment analysis returns positive emotionto transition to the next step when the user sends a message perceived as positive.Sentiment analysis returns negative emotionto transition to the next step when the user sends a message perceived as negative.Sentiment analysis returns neutral emotionto transition to the next step when the user sends a message perceived as neutral.
Here’s a common way of using this powerful feature:
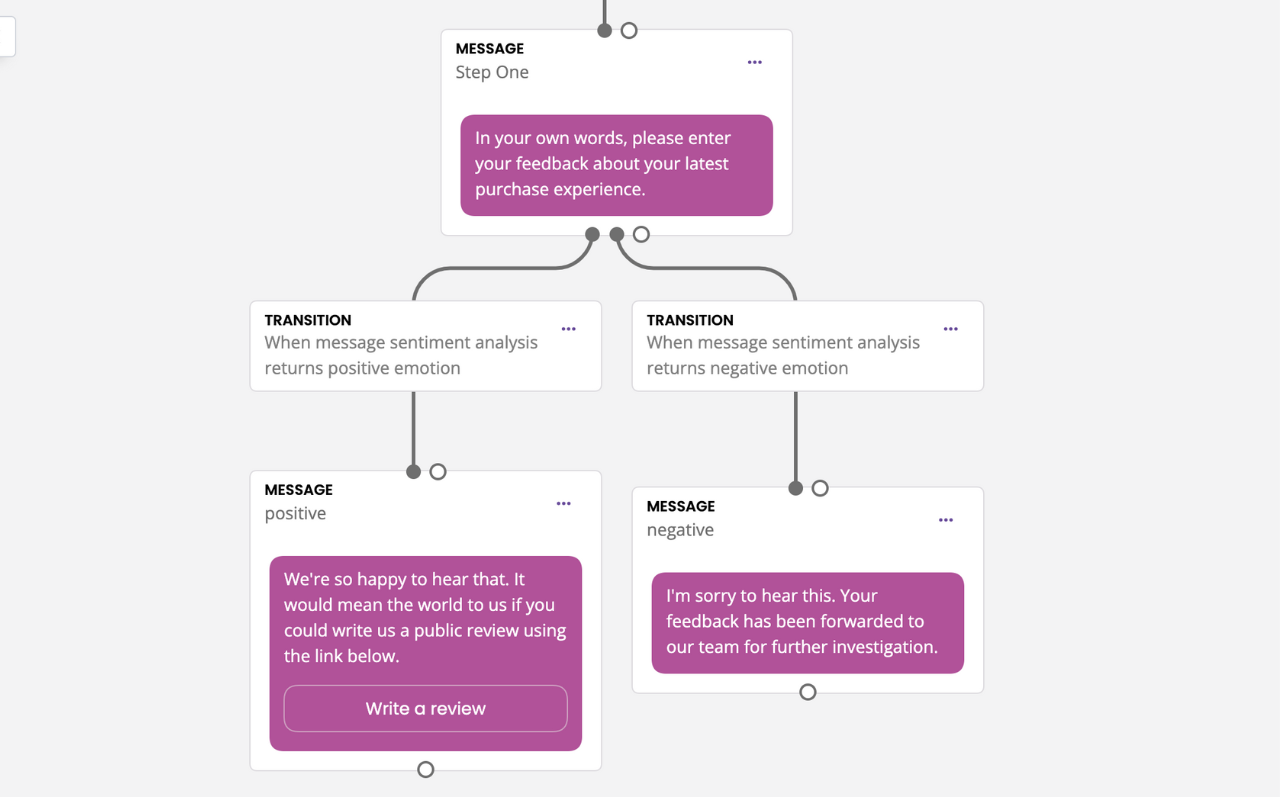
In this example, we ask the user to provide feedback about a recent experience. If the AI analyses their response as overall positive, they are encouraged to leave a public review. If the AI analyses their response as overall negative, their feedback is kept internal.
Step 4: Use variables
Beyond the transitions, you also have access to two variables related to sentiment analysis:
{{sentiment_analysis.type}}stores the sentiment of the user’s last message (positive, negative, neutral).{{sentiment_analysis.confidence}}stores how confident our AI is in the sentiment type using a number between 0 and 1.
With these variables, you can create any automation you may dream of. For example:
Use dynamic templating to display a different message on a single step based on sentiment.
Use the confidence score to fine-tune the empathy of your response. For example, a negative message with a 0.97 confidence score (very high) is extremely likely to be negative, so you can safely display an empathic message. A negative message with a 0.30 confidence score on the other hand might be a bit more of a grey area.