
How to set up a Microsoft Azure OAuth
Last updated: 02 May 2023
Microsoft is one of the most common ways to grant authorization to your users. In this tutorial, we will go step-by-step through setting up a Microsoft OAuth.
This is a tutorial specifically aimed at Microsoft Azure. It is meant as an example of an end-to-end OAuth setup.
While using OAuth through other platforms (e.g. Google) will work in a similar way, it is important to know that each platform will have their own quirks and approaches. If you need help setting up your OAuth, please contact your account manager.
Step 1: Owner access
You will need owner access to your chatbot platform. You can see if you have owner privileges by looking for the word Owner in the bottom left of your platform:
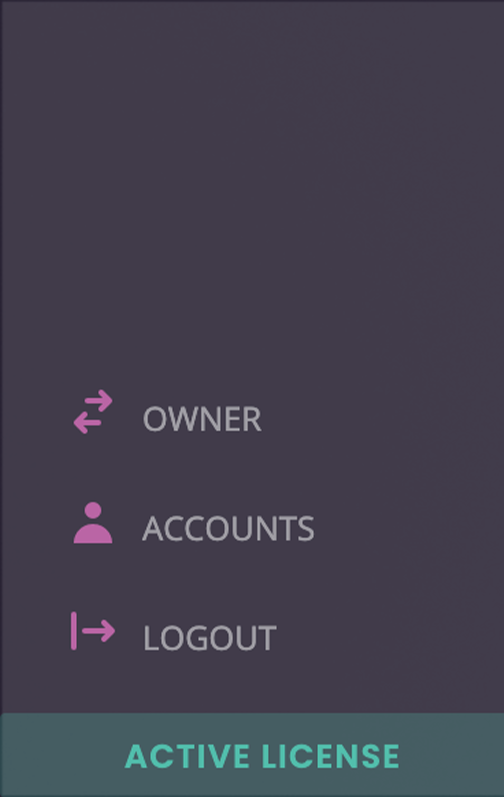
If you do not have owner access, you will need to ask your account manager.
Step 2: Gather your Microsoft OAuth details
To set this up, you will need the following SSO protocol information:
Client ID
Client secret
Authorization endpoint
Here’s a breakdown of where to find this information as of the writing of this document. Please note platforms like Microsoft Azure change often and, while we do our best to stay on top of it, the precise steps below might change:
In your Microsoft 365 admin centre, navigate to the Azure Active Directory.
Go to Applications → App registrations and click + New registration. Name your new app and add your first redirect URL
[your-chatbot-platform-URL]/callbackusing the Web dropdown option.In your new app, copy of the
Application (client) IDfrom the overview page and keep this ID safe somewhere. We will need it later on.Go to Authentication and add your second redirect URL
[your-chatbot-platform-URL]/api/auth/oauth2/callback.Go to Certificates & Secrets and click + New client secret. Name your secret and set the expiry date. Note: you will not get a notification when your secret is about to expire. Make note of when it will happen and make sure you update it a few days before it expires.
Once your secret has been created immediately make a copy of the 'secret value' field. The value will be hidden as soon as you leave the page, so copy it and keep it safe somewhere as you will need it later on.
Finally, click Overview and grab your
Directory (Tenant) ID. You will need this to create your authorization endpoint.
Step 3a: Create your OAuth integration
Log into your platform account. Do not go into the Owner area.
Go to Integrations and click Add new.
Give your integration a name (e.g. Microsoft (OAuth)). Enter your Authorization endpoint URL as the base URL and select REST.
Your endpoint URL should look like
https://login.microsoftonline.com/[Directory (Tenant) ID/oauth2/v2.0. Refer to Step 2 for help with finding your directory ID.Make sure you enter the base URL, which in our example ends in
/v2.0/and not the full endpoint.
Under Authorization type, select No Auth.
Add a Content-Type header with the following value: application/x-www-form-urlencoded
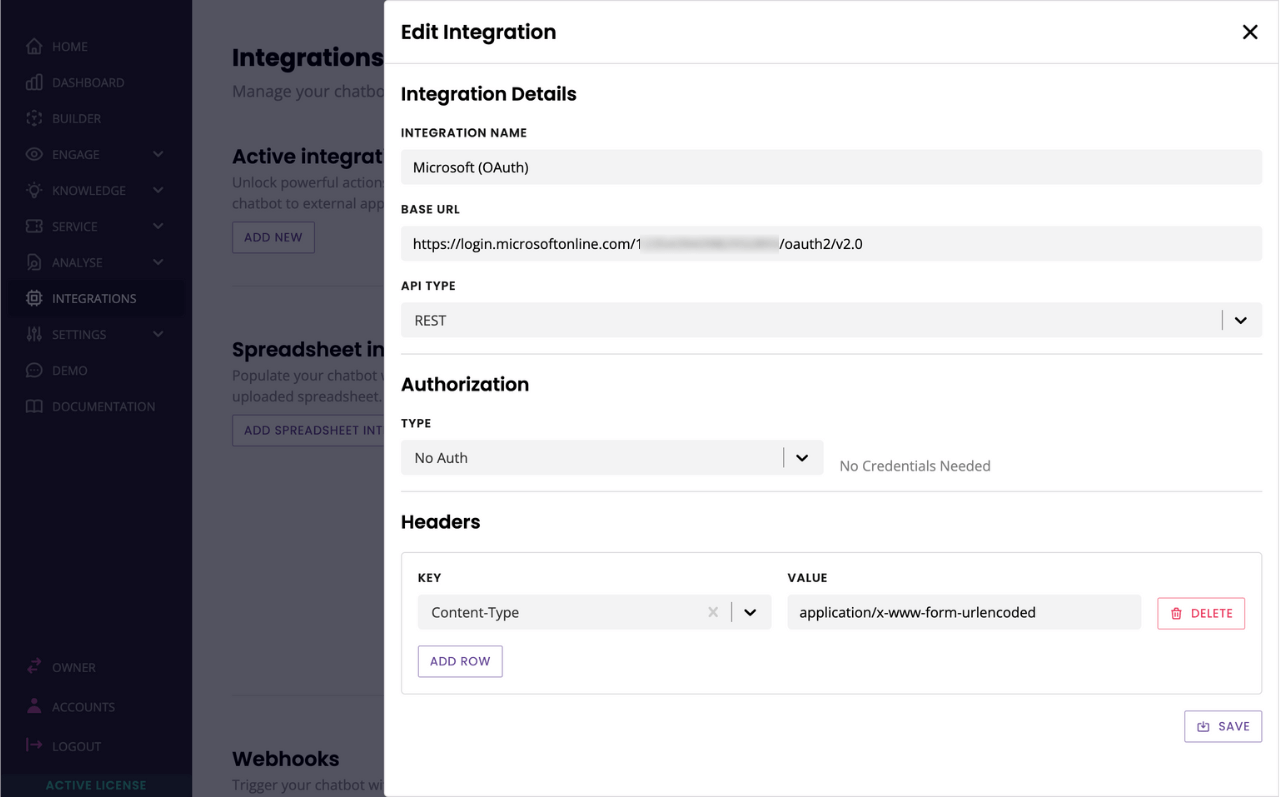
Hit Save.
Step 3b: Create your endpoint
On the integration you just created, click Endpoints.
Give your endpoint a name (e.g. Get access token). We'll make a POST request to /token.
In the request body, add the following information:
Key | Value |
|---|---|
client_id | [your Microsoft client ID] |
scope | |
code | {{ code }} |
redirect_uri | [your-chatbot-platform-URL]/callback |
grant_type | authorization_code |
client_secret | [your Microsoft client secret] |
It should look like this:
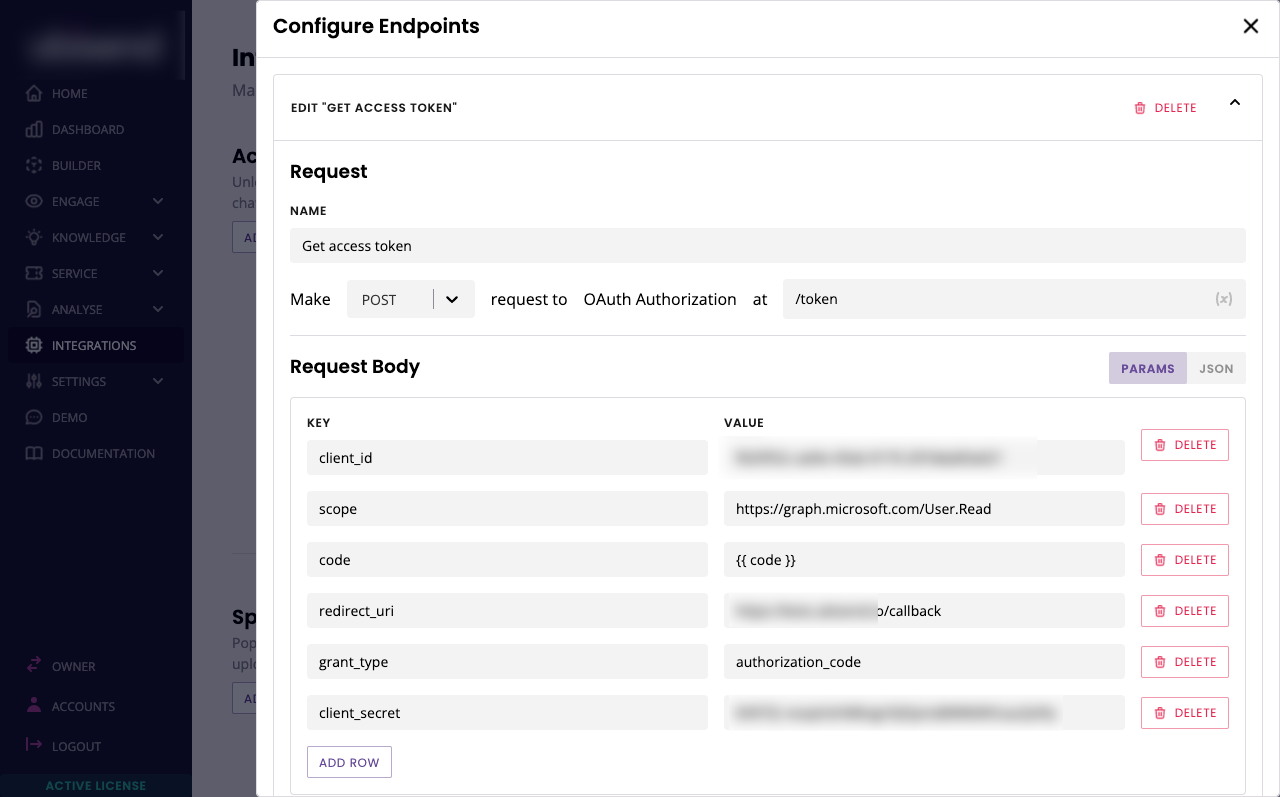
Hit Save.
Step 4a: Create your user identification integration
With this integration, we’ll match a user’s unique identifier returned from our previous integration with a record we store on said user in your chatbot platform (more on this later). If those match, we’ll let the user in. If they don’t, we won’t.
Go to Integrations and click Add new.
Give your integration a name (e.g. Microsoft (Graph API)).
Enter the following base URL: https://graph.microsoft.com/v1.0 and select REST.
In the authorization method, select bearer token and enter {{ access_token }}. This built-in variable stores the access token saved from the previous integration.
The token field will automatically obscure your text, so we suggest copy and pasting the variable into the field.
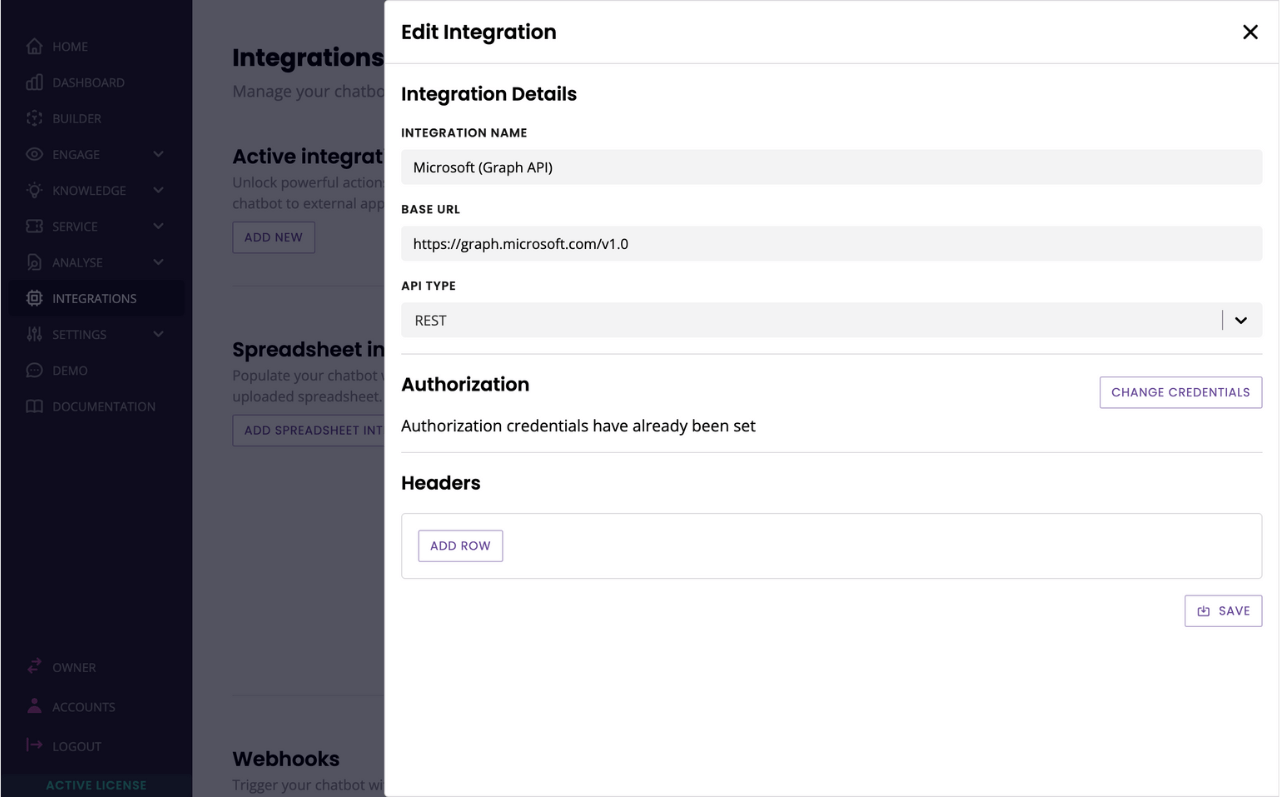
Hit Save.
Step 4b: Create your identification endpoint
We can now create the endpoint that will get the user’s credentials using the token.
Click Endpoints on the integration you just created. Name your endpoint and make it a GET request to /me.
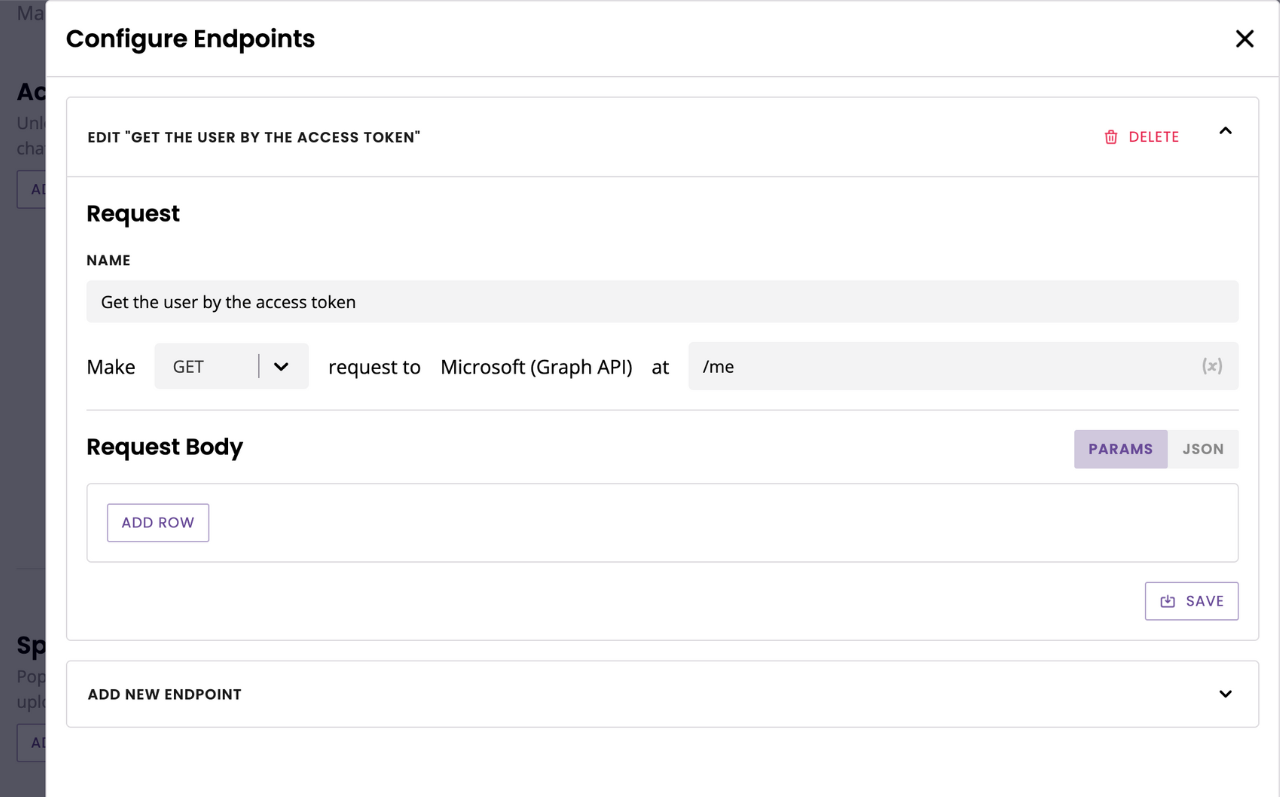
Hit Save.
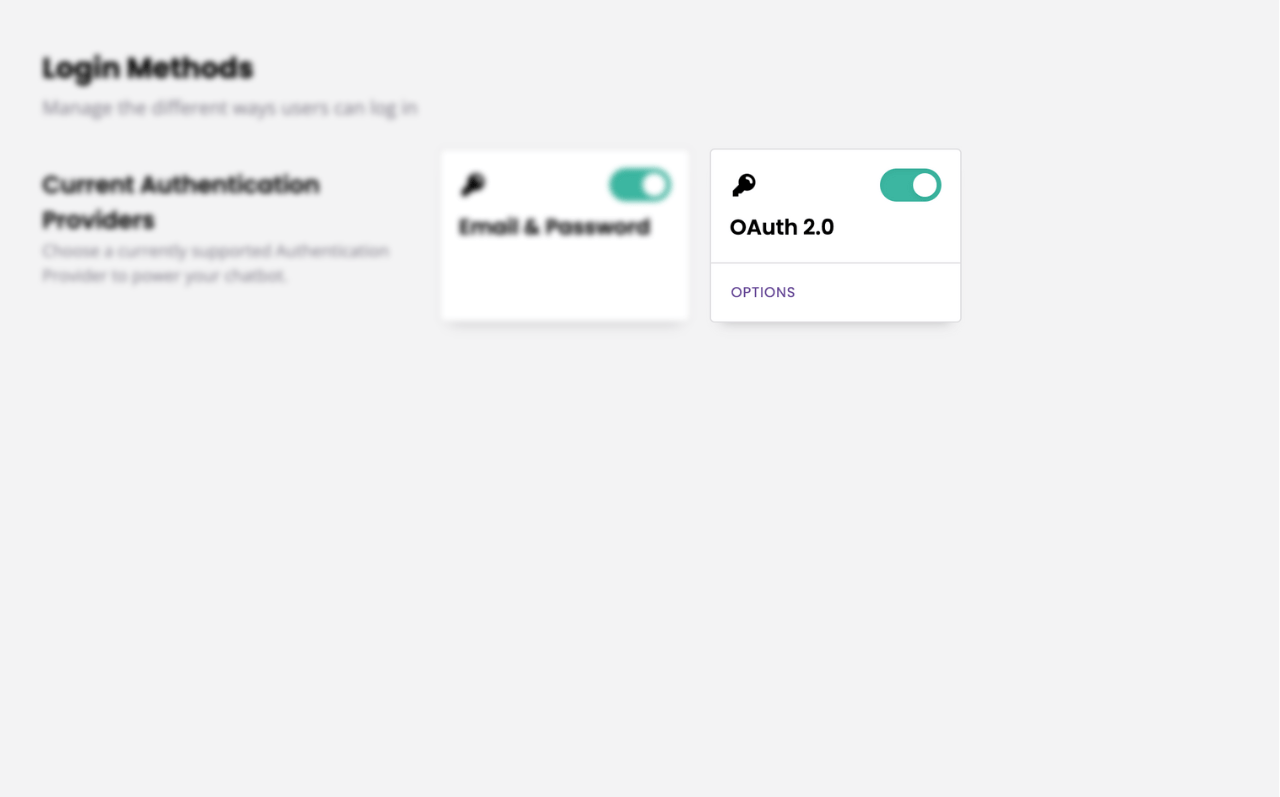
Step 5: Setup your OAuth integration
Click Owner in the bottom left of the platform to head to the owner portal.
Go to Login methods → OAuth 2.0 Options.
Give your OAuth a name. This name will appear on the login button on your login page; make sure it is relevant and recognisable.
In Auth URL, enter your full authorize URL (ends in .../v2.0/authorize).
Enter your client ID and secret.
State can remain empty.
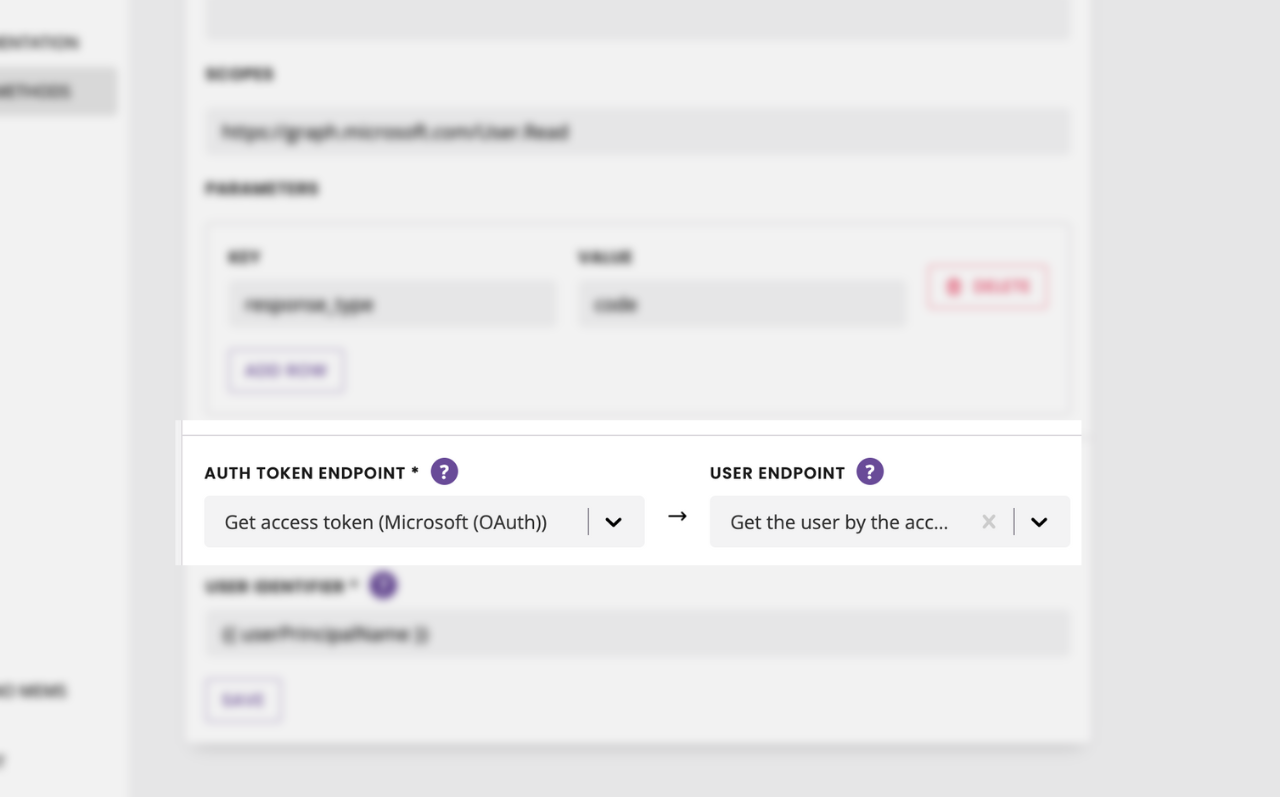
Under Scopes, enter https://graph.microsoft.com/User.Read
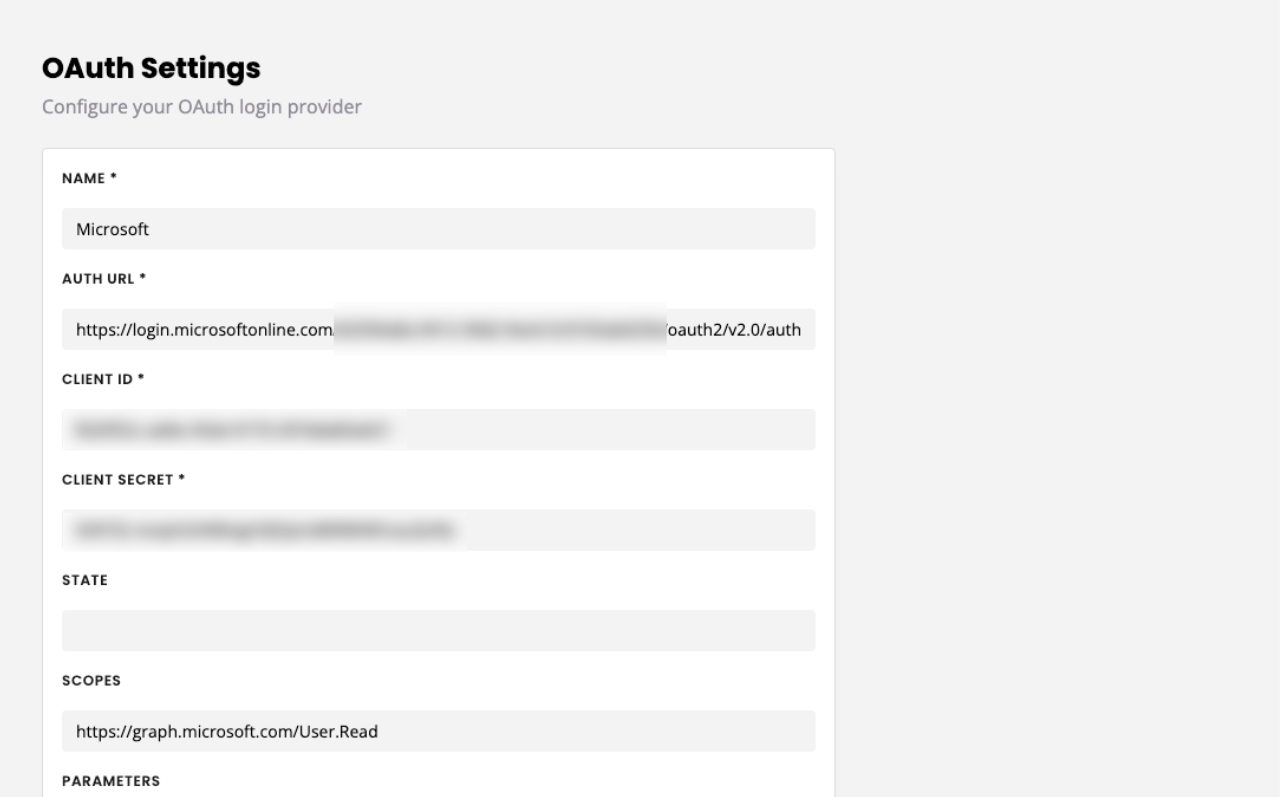
In the parameters, enter one row with response_type as the key and code as the value.
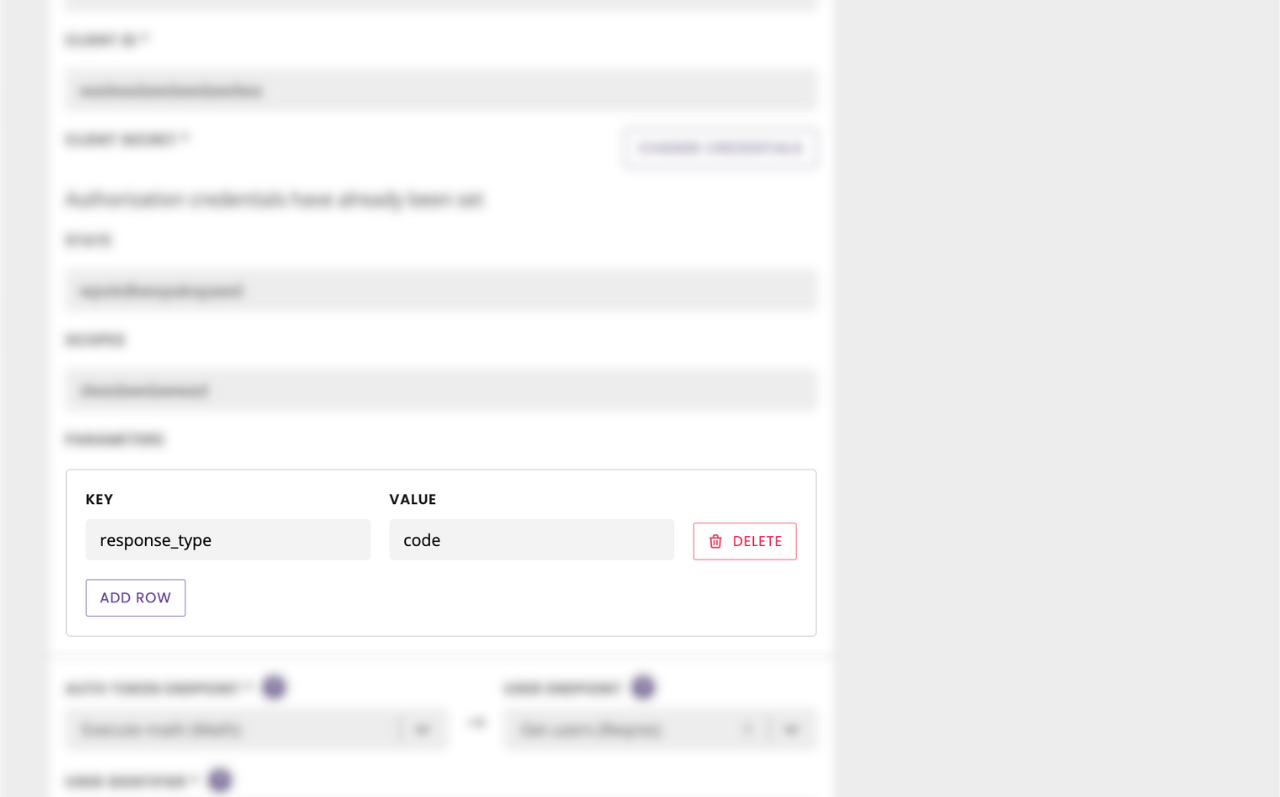
Finally, under the Auth token endpoint dropdown find the endpoint you created in step 3.
Under the User endpoint dropdown, find the endpoint you created in step 4.
Don’t hit save just yet.
Step 6: Pick a user identifier
The advantage of OAuth is it gives you the ability to authenticate a user for who they truly are before giving them access to the platform. This is usually done via a unique user identifier, which the OAuth integration will look at and make sure they match before letting the user into the platform.
This user identifier can be anything you’d like; as long as it is something your user endpoint (step 4) returns in the payload.
In our example, Microsoft may return the following payload:
{
    "@odata.context": "https://graph.microsoft.com/v1.0/$metadata#users/$entity",
    "businessPhones": [],
    "displayName": "John",
    "givenName": "Smith",
    "jobTitle": null,
    "mail": null,
    "mobilePhone": null,
    "officeLocation": null,
    "preferredLanguage": null,
    "surname": "Smith",
    "userPrincipalName": "user@company.com",
    "id": "029239-23029302-2323232-232323232"
}
We can use any of those as an identifier. Of course, we want to make sure it is unique (therefore using preferredLanguage is probably a bad idea).
The best out of all those for our example is userPrincipalName, which here is an email address and therefore unique to the invited user.
We will then:
Invite the user with their email address and their identifier,
userPrincipalName(which is this case is also an email address, but again it could be anything you'd like from the payload).As the user tries to log in, the OAuth will try and match their unique identifier from the invitation to the
userPrincipalNamethe platform receives when hitting the endpoint.If they match, we’ll let the user in. If they don’t match, we won’t.
So, going back to our OAuth setup, we can finalise it by entering {{ userPrincipalName }} in the User identifier field.
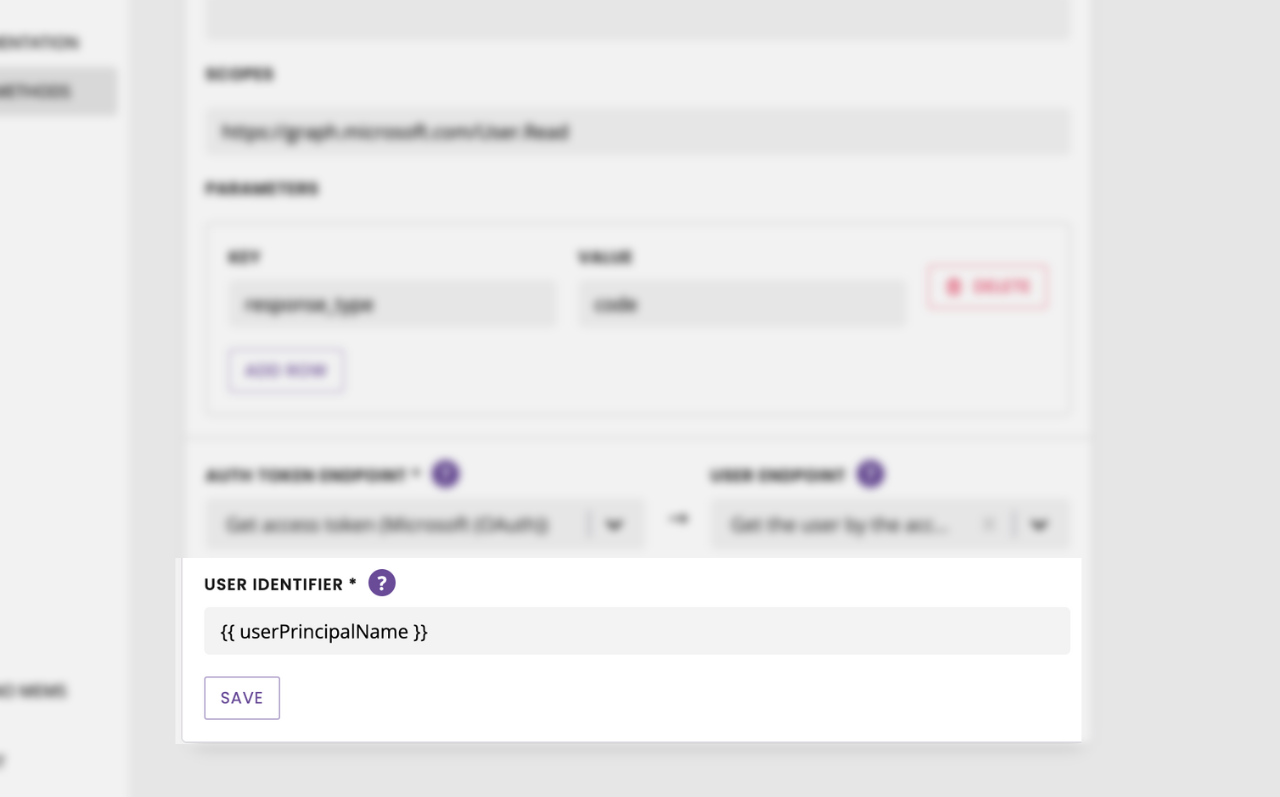
And we can finally hit Save.
Step 7: Invite users
You’re all set.
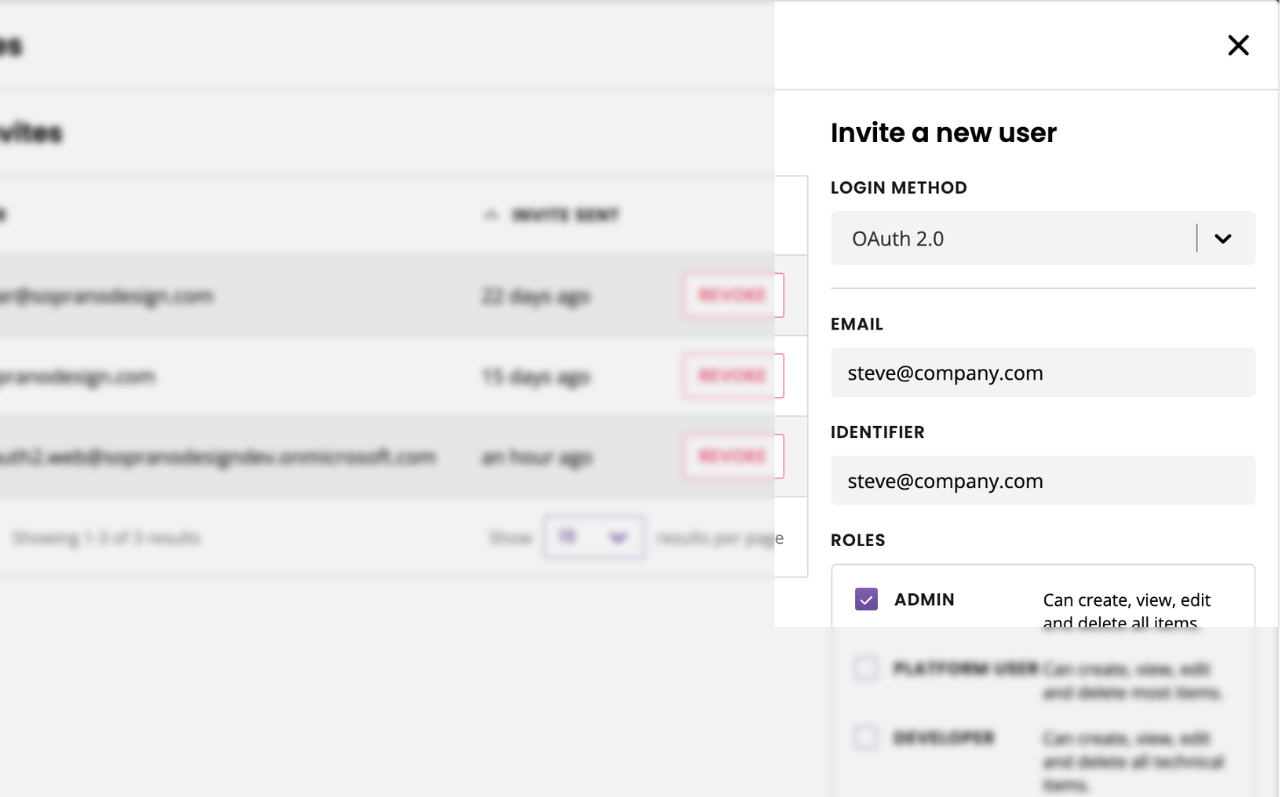
Switch out of your Owner portal (click the same button in the bottom left of your screen) and go to Settings → Users.
Click Invites in the top right.
Under Invite a new user, select OAuth 2.0.
Enter the user’s email and their unique identifier. In our example, both these fields will be the user’s email address.
Select a user role.
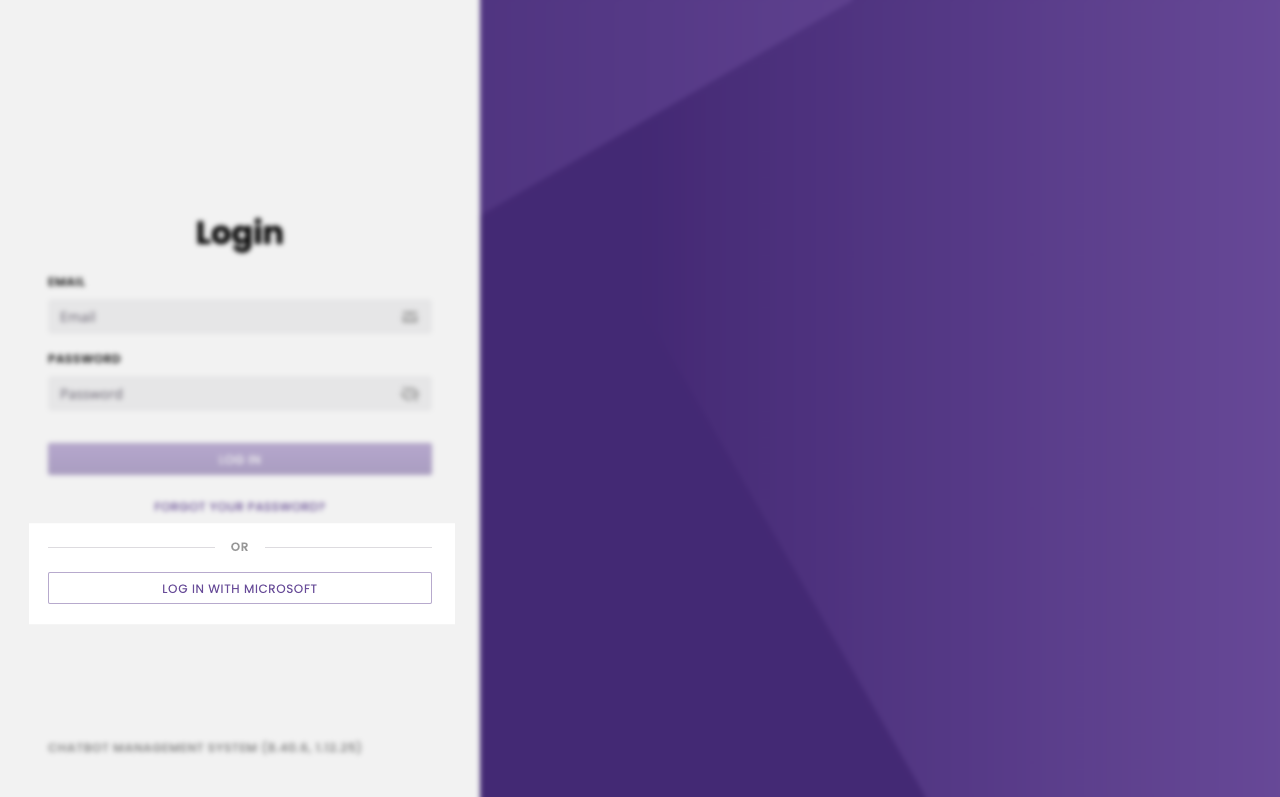
Your new user will receive an email inviting them to join your platform. As they click the OAuth button to login, they will:
Get redirected to Microsoft where
They will login using their Microsoft credentials, then
Get redirected back to your platform, and
(Assuming their credentials match) get logged straight into the platform.