
Example of a dynamic composer with an API
Last updated: 20 May 2024
To help us understand the power of dynamically creating a composer, let’s go through a quick example.
Data
Before we dive in, we will need a data source. For this example, we’ll use a free API called https://reqres.in. Their API is limited to a few data points, is free, and simple to use.
It’s helpful to understand this use case before you try and build something more relevant to your needs.
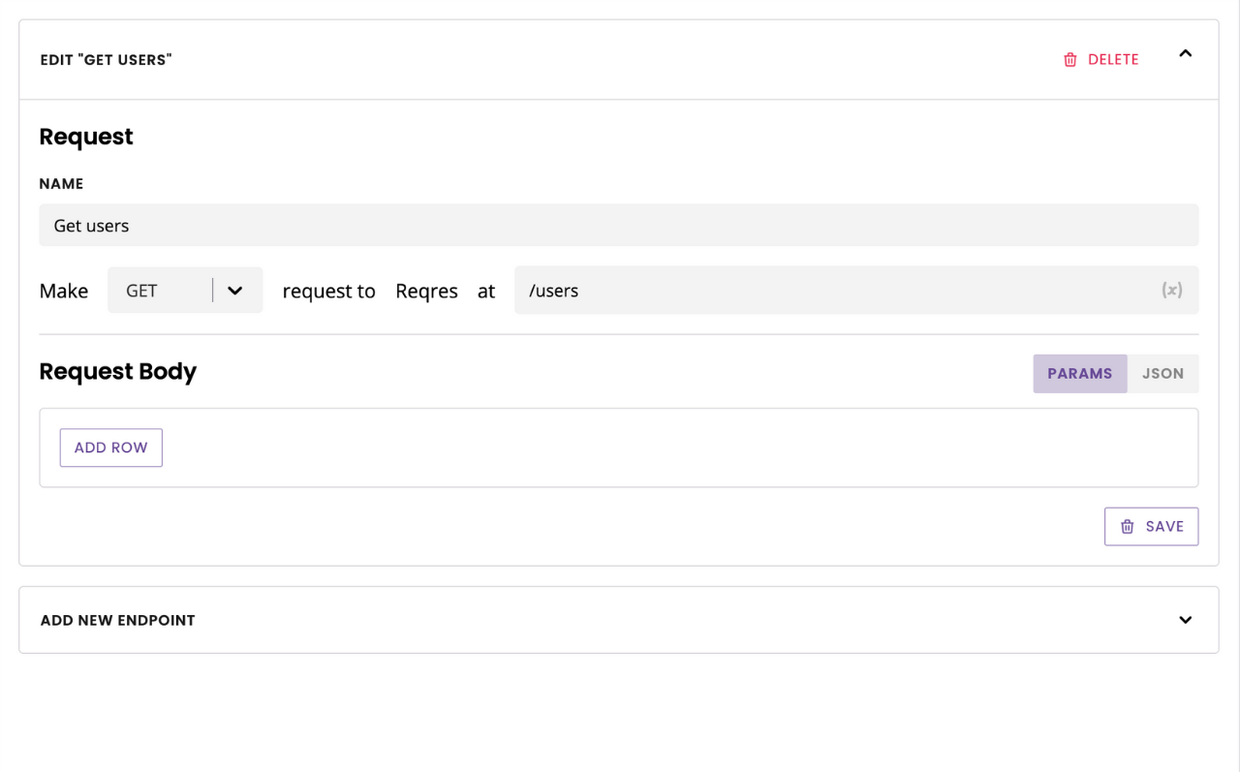
To get you set up, go to Integrations. Click + New integration.
Give your integration a name (e.g. Reqres).
For the base URL is https://reqres.in/api
This API doesn’t require any authorization.
There are no headers needed. Hit Save.
We will create a simple GET endpoint, which will allow us to retrieve the information from the API:
Data structure
Finally, it’s important to familiarise yourself with the structure of the data the API sends back. We can see their ‘List of users data is structured as such:
"data": [
    {
        "id": 7,
        "email": "michael.lawson@reqres.in",
        "first_name": "Michael",
        "last_name": "Lawson",
        "avatar": "https://reqres.in/img/faces/7-image.jpg"
    },
    ...
]
This is helpful, as we now know how to access a user’s first name; using data.first_name. Keep this in mind as we move to build our dynamic fuzzy composer.
Example - Dynamic fuzzy composer (for statement)
For this example, we’re going to pretend we are building a chatbot that allows its users to book a session with a coach at our gym.
Our database is full of helpful coaches. Just like in any business, some join, some leave; the available coaches change all the time.
Manually building a fuzzy composer that gives the user a list of available coaches would be a pain. Every time one of our coaches quit (or one joins), we would have to go and edit the composer. Boo, boring.
Thankfully, dynamic composers can save us from this ultimate snoozefest.
Create the custom composer
Go to Engage → Composers.
On the right-hand side, you will see your custom composers section. Click Create composer.
Select the dynamic composer option in the dropdown.

Pull the data
Give your composer a name (e.g. “Coaches”).
Under Variables, we will grab our integration. This is the section we use to tell our chatbot where it should go and fetch the data to populate our fuzzy composer.
Because we’ve created an integration, select Use API response. You can follow a similar process with a spreadsheet integration.
Pick your integration name and its endpoint in their respective dropdowns.
Create a dynamic fuzzy composer
Delete everything from the code editor, as we’ll start from scratch.
Our platform allows you to create a dynamic version of any of our composers. For this example, we need a fuzzy composer, so using the Add composer… dropdown, select Fuzzy.
Learn about the fuzzy composer and its associated values.
Write the template
We will use a for loop to populate the value inside the items section. Put your cursor below the first [ and click the </> For tag button. Grab the {"label": "", "value": ""} and paste it inside the for loop.
{
    "type": "fuzzy",
    "content": {
      "placeholder": "Choose an option...",
      "multi": false,
      "items": [
		{% for variable in variables %}
            {"label": "", "value": ""}
 		{% endfor %}
      ]
    }
}
We’re getting there! We now need to adapt the loop to match the data we receive from the API.
Then, we enter the values inside the label. We’re going to display the coaches' first and last name in the label and its value.
Finally, we’ll add a short piece of code that tells our chatbot to stop looping once it has found the final value in the dataset.
This gives us:
{
    "type": "fuzzy",
    "content": {
      "placeholder": "Choose an option...",
      "multi": false,
      "items": [
		{% for coach in integration.data.data %}
            {
			    "label": "{{coach.first_name}} {{coach.last_name}}",
			    "value": "{{coach.first_name}} {{coach.last_name}}"
		    }{% if not loop.last %},{% endif %}
  	    {% endfor %}
      ]
    }
}
We are done! Hit Save.
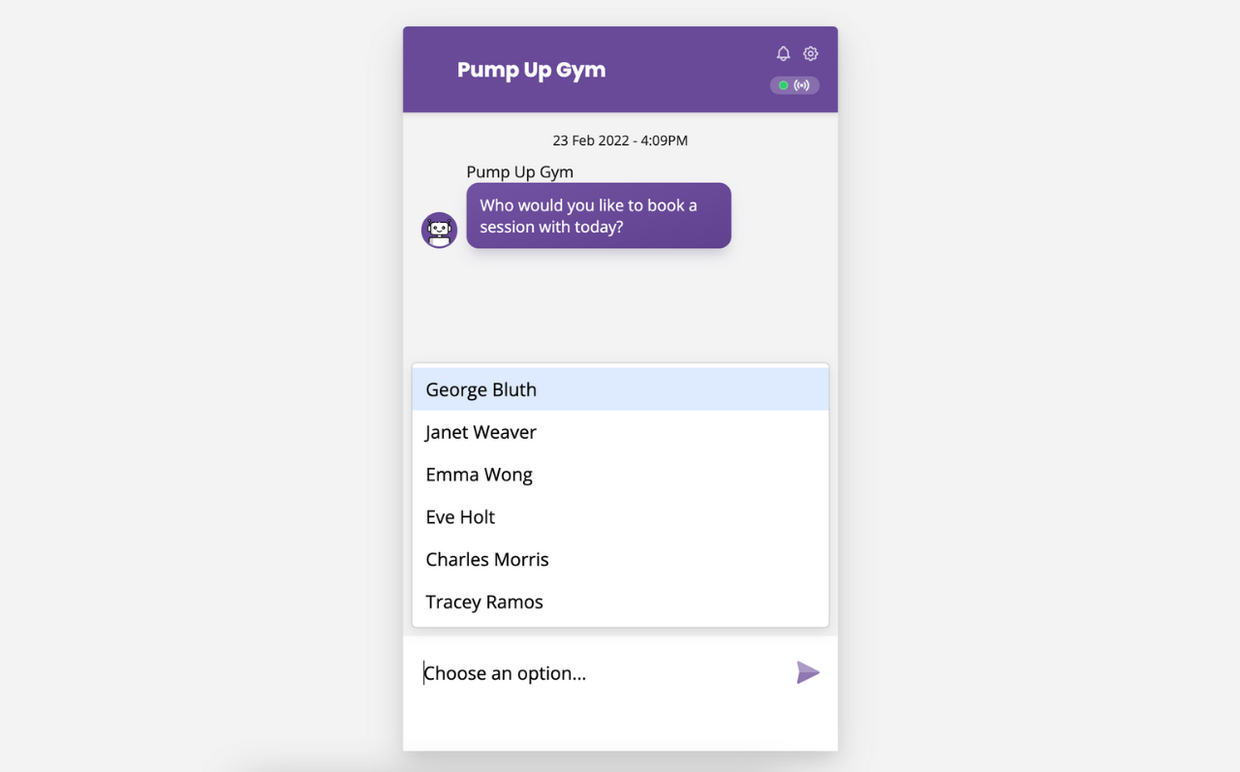
Make sure you tie your composer to a message step, then go to your Demo and give it a try. If you’ve followed this example, you should see the following:

Use cases that follow the same approach
A standard composer that displays the user’s name if we have it stored (using `if` statement).
A fuzzy composer that displays a list of available clothing sizes, pulled from a spreadsheet.