
Allow users to search your knowledge base content with semantic search
Last updated: 05 December 2023
Semantic search allows your users to ask a question to your chatbot using natural language, and get the chatbot to find the answer in your knowledge base articles.
It’s an incredibly powerful feature to leverage, as it means you can set up a fully intelligent chatbot in just a few clicks.
Below, we go through each step required to set up semantic search.
Step 1: Activate semantic search
To activate semantic search, head over to Settings → Semantic search and flick the feature on.
Step 2: Create a knowledge base
Before we allow users to search anything, we need to feed the chatbot information. To do this, we’ll use knowledge bases.
Get a refresher on knowledge bases.
Head over to Knowledge → Knowledge bases.
Click + New knowledge base.
For the purpose of this doc, we’ll imagine we are creating an HR chatbot. The knowledge we want to inoculate into the chatbot is the entire company’s employee handbook. It’s a big, 50+ pages-long PDF.
Content searching works with any type of knowledge bases, not just PDFs.
Name your knowledge base.
Select PDF Import as the Type.
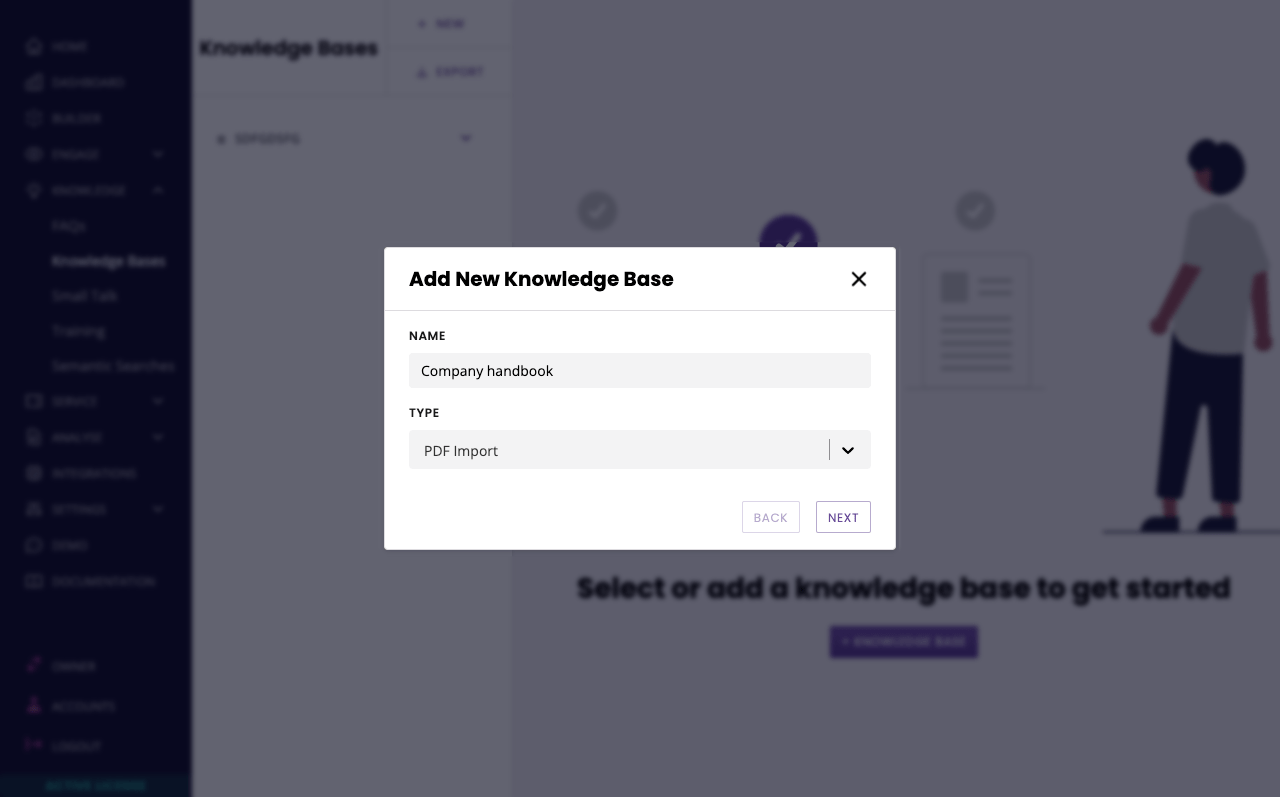
Click Next.
Click Select file and find the file in your computer folders.
Files must be .pdf and a maximum of 6MB. You can use this tool to shrink your PDF if it’s too large: https://shrinkpdf.com
Hit Save.
Depending on the length of the document you’ve uploaded, it may take a few minutes to process. Once it’s done, you should see your new knowledge base, along with every single article listed under it.
Step 3: Clean up your content
If you did import a PDF or even a sitemap, chances are some of your content might need a bit of cleaning up. The platform does its best to extract content, but sometimes design elements get in the way.
Go through each page and use the editing features to make your content picture-perfect.
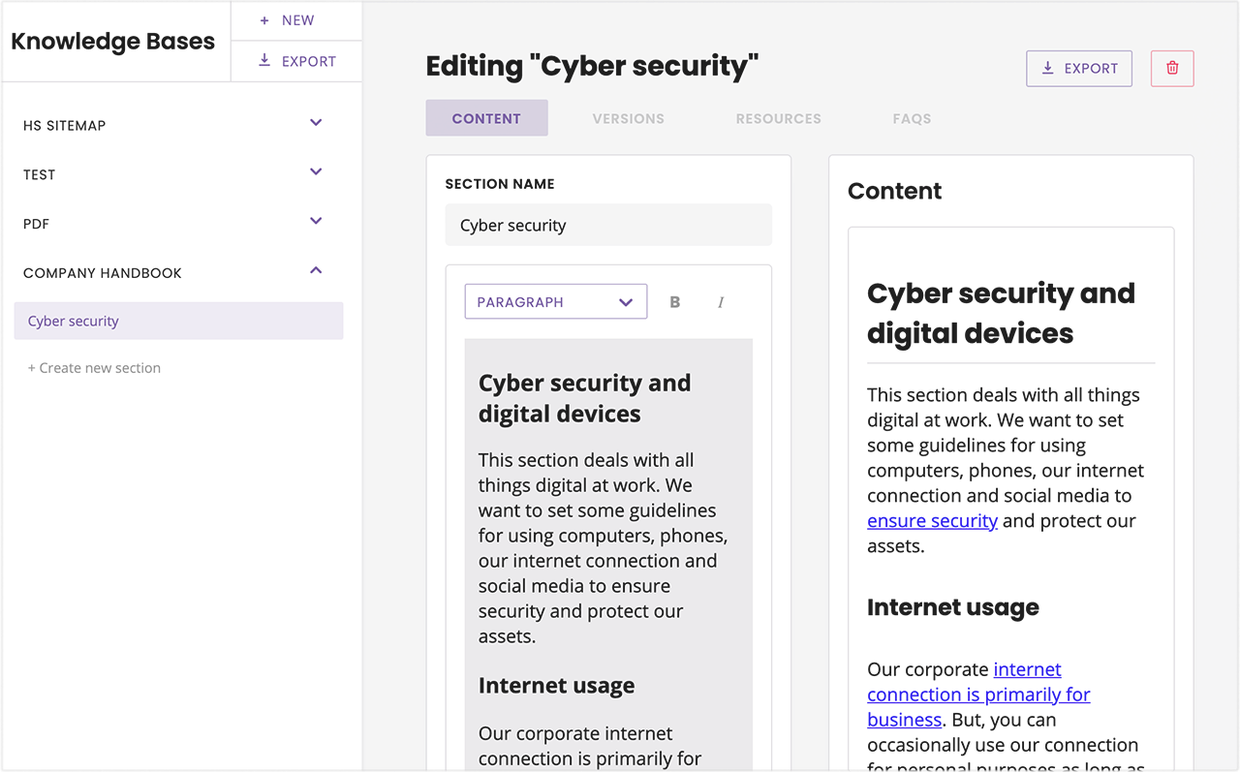
After every article update, click Submit revision.
Then, head over to Versions

Find your latest revision in the list and click View.
Give your revisions a final read, and if you’re happy click Approve in the top right.
Step 4: Make your content searchable
Now that you have set up your knowledge base and cleaned up your content, it’s time to make it searchable.
In the left-hand side menu, click on your knowledge base’s name.
In the settings, select the articles you’d like to make searchable. If you are happy with your entire knowledge base being searchable, click Select all.
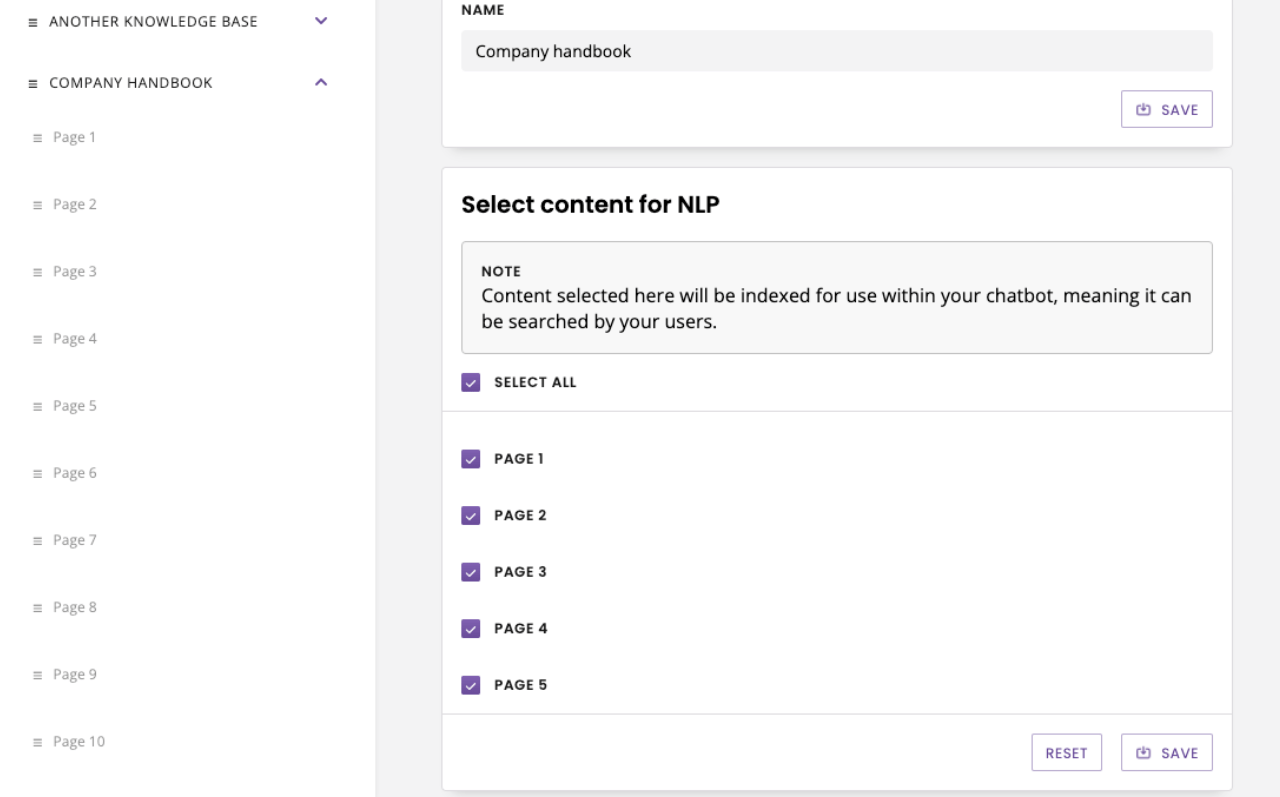
Hit Save.
Step 5: Create a content search conversation
The content search feature is a conversational event. It was specifically designed so you can trigger it at any point in a conversation.
For example, your chatbot might allow employees to book time off. This is a standard and simple conversation to automate with the chatbot platform.
At the end of this conversation, you could add a final step such as ‘Any other questions?’, where the content search takes over.
For the purpose of this doc, we’re going to build a content search conversation from the ground up.
The trigger
Head over to the Builder.
Click + New workflow in the top right. Give your conversation a name and a description.
For the trigger, let’s set up a placeholder trigger such as When message equals search
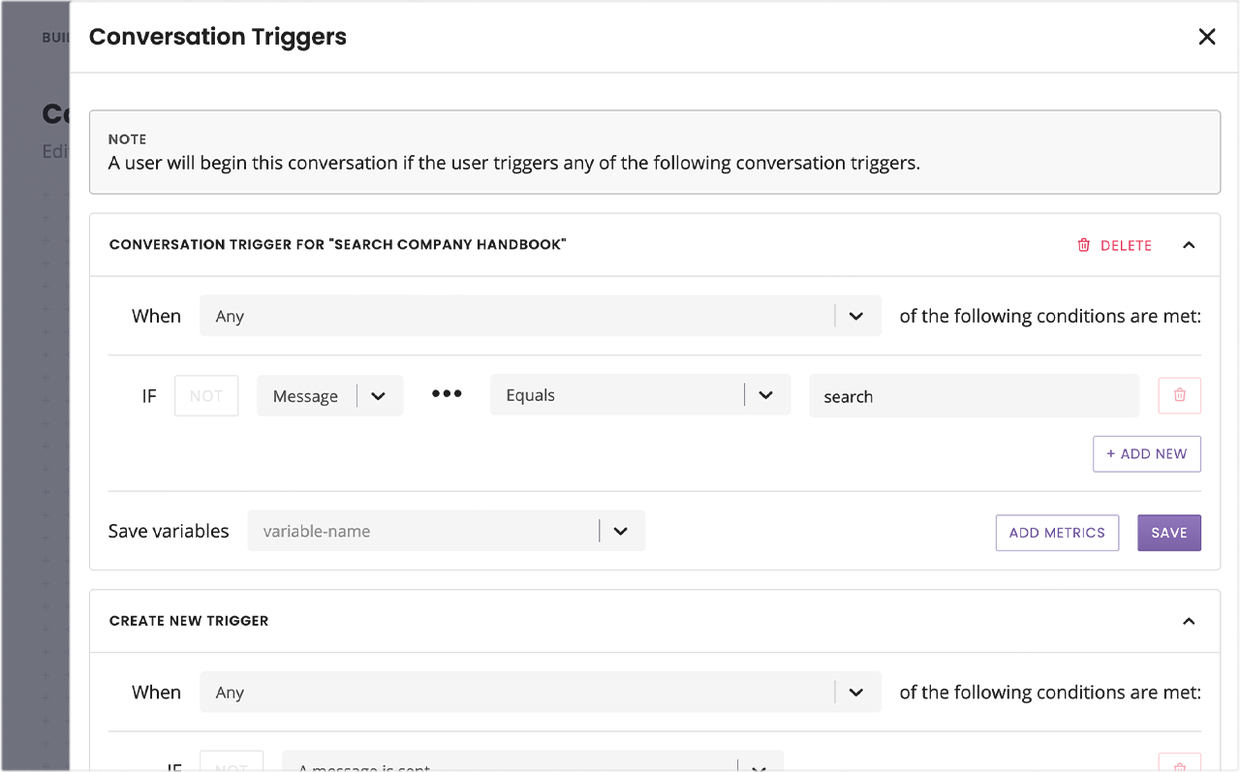
Hit Save.
The prompt
The first step of the conversation will inform chatbot users that they can ask a question. Hit the three dots on the step and click Edit response.
Write a short message such as: “I can help you find answers in our employee handbook. Just ask me a question”. Hit Save.
The answer
Grab a new step from the Block bank and drop it onto the canvas. Give your step a name.
Change the message type to Content.
In the message field, add a short message such as “Here’s what I found”.
In the content title field, add the knowledge base name variable, {{knowledge_base.section_name}}.
In the content body field, add the knowledge base content variable, {{knowledge_base.section_content}}.
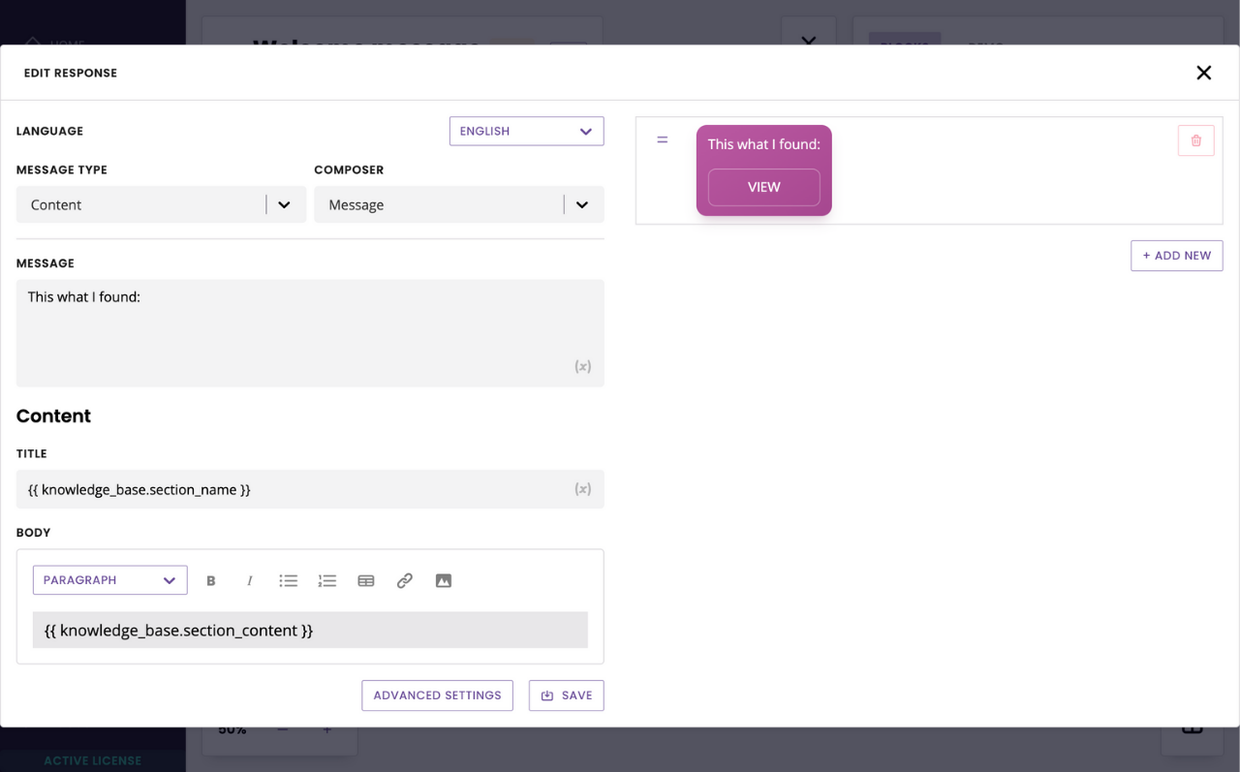
Hit Save.
The transition
Click the dot at the bottom of the first step and connect it to the dot at the top of the new step.
In transition, find the event Content import is triggered.
Hit Save.
Step 6: Test your content search conversation
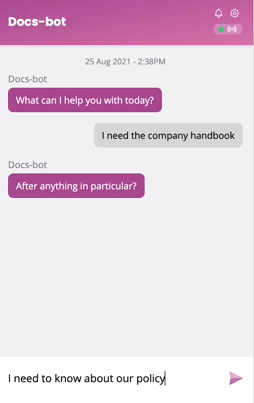
Go to Demo.
Use the keyword you’ve set up to trigger the conversation (here “search”).
Ask a question related to the content you’ve uploaded into the chatbot. The chatbot will respond with your content message. Click View to see the section of content your chatbot has identified contains the answer to your question.
Congratulations, good to go!
FAQs
My chatbot is not returning the knowledge base article I want from the searches, what can I do to improve its results?
There are three things you can do:
Make sure your article(s) contain content that is related to the topics they are meant to be about. For example, if you’d like your chatbot to return an article about horses when users ask about horses, make sure the article is about horses. Does it contain the word ‘horses’ in its content?
Add keywords in your article’s metadata. Here’s how.
If you are adamant a specific search must return a very specific article, you can use advanced settings and postbacks to guarantee the result. Here’s a tutorial on how to do this.
Some of my knowledge base articles are images and have no words. How do I make them searchable?
Semantic search will look for a match between the question and word-based content inside your knowledge base articles and article metadata. Images are not crawled. However, you can add metadata on all your articles including ones that are solely images. Here’s how.
Your semantic search will search and return image-only knowledge base articles according to their metadata.